


A widespread problem with Intel Core 13th Gen HX and RTX 40 series caused sporadic screen freezes. This update article describes the solution in the form of a BIOS update for XMG NEO 16 and XMG NEO 17 from 2023.
Last update: May 8, 2023
Solution is released for all versions
Update #6 – April 24, 2023
Article has been fundamentally revised:
- Current solution incorporated for RTX 4080/4090.
- Obsolete sections removed.
The following is the latest and best version of the article. Those who have already read an older version of the article can jump straight to the “Instructions” section.
Update #7 – May 8, 2023
BIOS update for RTX 4060/4070 has been released.
Summary
In early March 2023 a situation has arisen that seemed to be affecting multiple brands and vendors with Intel Core 13th Gen HX-series systems, not only XMG.
Typical symptoms
- Random freezes in Windows/Web/Office workloads
- Display not going black, but all movement freezing, including mouse cursor movement
- Freeze continues for minutes, system needs to be shut down hard
- Issue mostly occurs in light load, not in Gaming
→ Event Viewer shows failure on “nvlddmkm”
→ nvlddmkm is part of the NVIDIA display driver - System attempts to reset driver, but freeze continues until system is shut down
There may also be further variations of these symptoms.
Root cause and mitigation
According to our current information, the suspected root cause is not (or not only) in the NVIDIA driver or NVIDIA GPU. Although the nvlddmkm Error in Event Viewer is part of the NVIDIA driver, it rather seems to just be a victim of an underlying issue.
Firmware update as potentially final solution
We are providing a firmware update that affects three important firmware components:
- BIOS update
- EC update (Embedded Controller)
- Management Engine (ME) update
The most essential part of the solution is to be found in the ME update, which contains further components of Intel firmware reference code. This includes the so-called SPHY firmware 13.0.1.7085.
Instructions
If you own XMG NEO (E23), please carefully read these instructions.
BIOS update is different between RTX 4060/4070 and RTX 4080/4090
XMG NEO (E23) has two different mainboard layouts:
- One for RTX 4060 and RTX 4070
- One for RTX 4080 and RTX 4090
Due to these layout differences, XMG NEO (E23) also has two seperate sets of EC and BIOS firmware. These solution has been released on different dates:
- RTX 4060/4070: May 8, 2023
- RTX 4080/4090: April 24, 2023
When attempting to update your EC/BIOS with the file from the wrong model, you will get an error message and the update will not proceed.
(Non-)Compatibility with laptops from other brands
This BIOS updates is only compatible with XMG NEO (E23). Our BIOS may not be compatible with laptops from any other brands. If you install our BIOS on 3rd party laptops, at the very least your Fn key layout may not be aligned anymore with the icon printings on your keyboard. If you install our BIOS on 3rd party laptops, we will not be able to help you recover the system to its previous state.
Download
Please find the update in our download portal:
The update is located in the “Firmware” section.
Suspend Bitlocker or Device Encryption before installing BIOS updates
Your system may use device encryption, even if you have never manually enabled it. It is better to suspend device encryption as some BIOS updates may cause issues with it. In Windows, open “Device Encryption” and turn it off (suspend Bitlocker protection). For safety: create a backup of your Bitlocker recovery key and store it on external media. If you use RAID or VMD, check the information on RAID at the end of this file.
Preparation
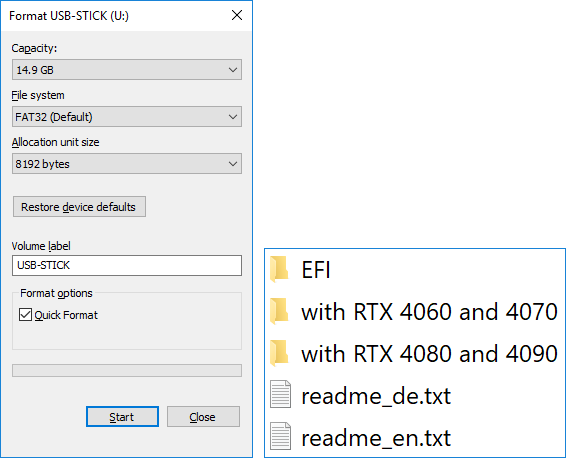
Prepare a USB thumb drive, formatted with with FAT32. Extract the content of the package onto the thumb drive. A more extensive set of instructions can be found here: https://go.xmg.gg/bios-update
Step 1: Installation of BIOS Capsule Update (EC and BIOS)
Instructions:
- Make sure system is “plugged in” with external power.
- Reboot and disable “Secure Boot” in BIOS Setup (press F2 to enter BIOS Setup).
- Boot from USB thumb drive (press F7 to select boot media during reboot).
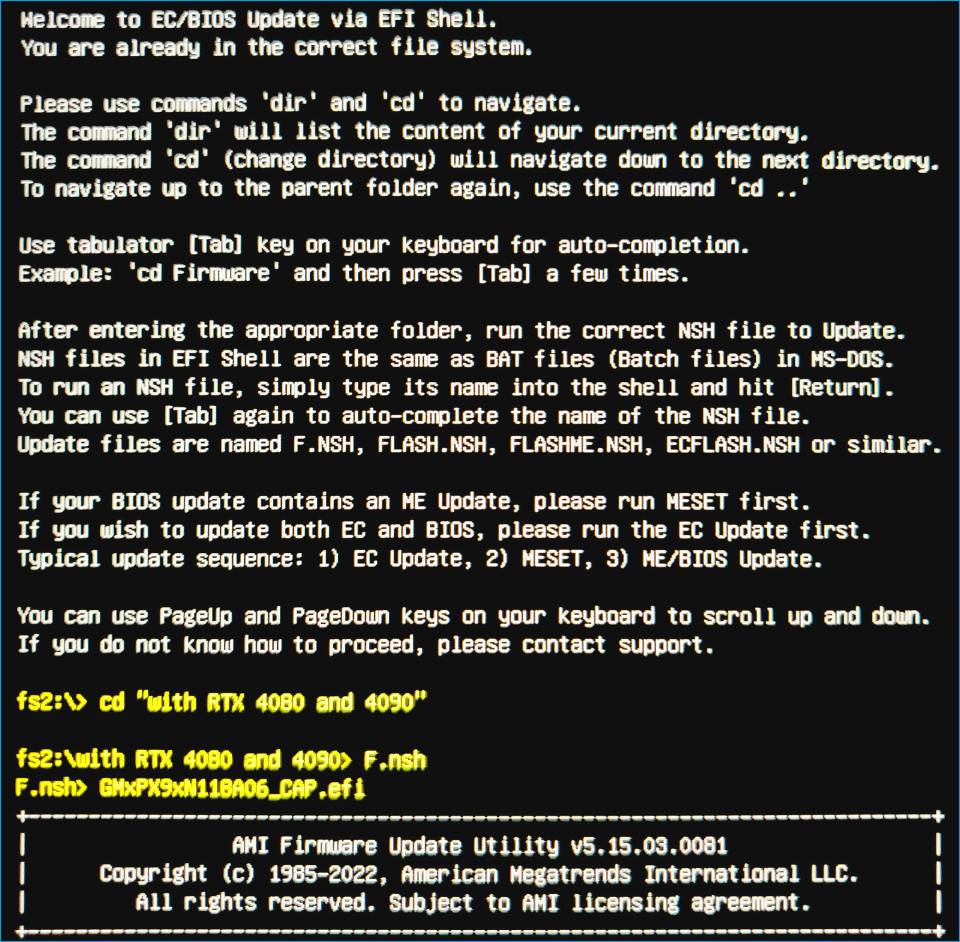
- In EFI shell, navigate to the folder for your GPU
→ Type “cd”, then a space, then press Tab key until your GPU is selected, then press Enter. - Write the command “dir” to list the folders in this directory.
- Go one layer deeper into the folder “1_Capsule-BIOS”.
- Run F.nsh
→ Type “F” (without space), press Tab key and press Enter. - The update may cause automatic reboot or shutdown. Do not interrupt the process.
- Do not interrupt the process.
Step 2: Installing Management Engine (ME) Update
The Management Engine is an integral part of the Intel CPU platform. When it has important new firmware ingredients, it must also be updated. For reasons of system architecture, the ME update is not done automatically along with EC and BIOS.
The currently installed ME firmware version can be read in the BIOS setup (start page, “Main”) by scrolling all the way down. The ME update, on the other hand, can be executed inside of Windows.
The ZIP file should be unpacked (extracted) on the local system drive (e.g. in the download folder). A USB stick is not necessary for this step.
Instructions:
- You are in Windows. Close all programmes that may contain unsaved data.
- Again make sure the system is “plugged in” with external power.
- In the folder “2_Management-Engine”, right-click on the file “Setup.bat” and start it with admin rights.
- Follow the instructions on the screen.
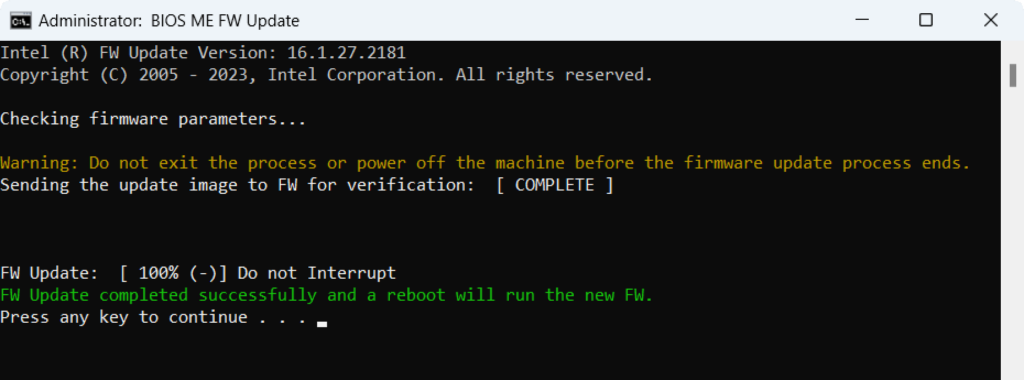
Windows will restart automatically as soon as you close the installation window after a successful update.
Step 3: Check the EC firmware
In some cases – especially if the previously installed BIOS is already quite old – it can happen that the EC firmware, which is usually part of the Capsule BIOS update, is not updated in the first step. Therefore, you should check again after executing the update whether the EC firmware was successfully updated as well.
Instructions:
- Search for “msinfo32” in the Windows start menu and open the thus found “System Information” panel.
- The first screen (“System Summary”) lists the EC and BIOS version numbers.
- The EC version number is listed as “Embedded Controller Version”.
- Check whether the listed number corresponds to the number in the file name of the ZIP archive.
→ If the listed number differs: perform the Capsule BIOS update a second time.
Background information:
The EC version number can also be read out in the BIOS setup (start page, “Main”). There it is structured according to the following scheme: “x.yy.zz”, for example: 1.09.00. Only the digits before and after the first decimal point are relevant for checking, i.e. “x” and “yy” (for example: 1.09). The third number (after the second dot, i.e. the “00” in “1.09.00”), on the other hand, indicates a static sub-version for different chassis IDs. This third number does not change with the updates, which is why it is not listed in the file name of the ZIP archive.
Tip:
If the EC firmware is indeed installed during the BIOS Capsule update, a progress bar appears at the end of the installation process with the title “Updating EC Firmware”.
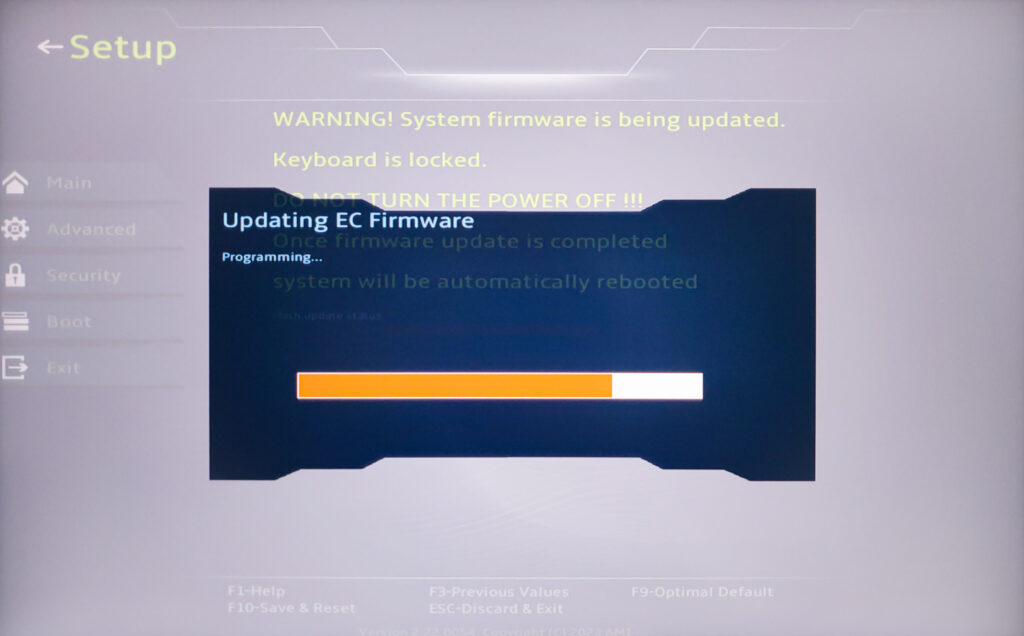
During this process, the fans run at full speed, as the EC firmware is responsible for the fan control and is not available during the update. If you saw this “Updating EC Firmware” screen, then you can be quite sure that the EC firmware has also been updated.
Step 4: BIOS reset
After firmware updates, it is always recommended to perform a BIOS reset, i.e. to load the default settings. This applies even if you have not changed any settings yourself.
Instructions:
- Press and hold F2 during boot-up to enter BIOS setup.
- Press F9 to load the default settings. Press F10 for Save & Exit.
For RAID users
This section is only for users who have independently combined two SSDs into a RAID array. Rule of thumb: If you don’t know what RAID or VMD is, then you probably don’t have RAID and can ignore this section.
If you indeed use RAID, please create a backup of your most important data – better be safe than sorry. BIOS updates may reset the RAID options in BIOS setup. After the BIOS update, please go to the BIOS setup (F2) and manually restore your previous RAID settings. If you miss this step and rebuild the RAID later, the BIOS will mark the RAID as “degraded”. If you are using RAID 1, the rebuild should still be possible without any problems. The previous backup is merely meant as an additional safety measure.
Additional tips
1) Install the latest NVIDIA driver
NVIDIA regularly releases new GameReady drivers. Version 531.41 from 23 March was reported to have significantly reduced freezes (even before the final EC/BIOS/ME update presented here), as the driver slightly increases the operating voltage of the graphics card at idle (by less than 1%), which may indicate that the driver was a reaction to freeze problems at idle or under low load. It is therefore generally recommended to install the latest NVIDIA driver.
Official directory: https://www.nvidia.com/en-us/geforce/drivers/
If you use NVIDIA Optimus or NVIDIA Advanced Optimus, it is also recommended to update to the latest Intel graphics driver:
Download: Intel Arc & Iris Xe Graphics (Beta) Driver
To prevent the Intel graphics driver from being overwritten by Windows Update, driver updates must be deactivated across the board via Windows Update. This FAQ article describes how to do this: How can I prevent Windows Update from automatically updating my drivers?
2) Manually set the memory clock speed to “5600” or “5200” (not to “Auto”)
By default (e.g. after BIOS reset), the value “Maximum Memory Frequency” is set to “Auto”, whereby the system automatically recognises and uses the highest possible speed of the installed RAM modules. It is reported that this function currently has a bug, according to which the operating voltage of the RAM is higher in “Auto” mode than when the speed is set manually. This increased operating voltage cannot be detected directly with monitoring software, but it is noticeable in a higher RAM temperature.
As we indicated in this update thread, we were not able to reproduce this bug yet:
Nevertheless, we have received plausible reports from customers who see a significantly higher temperature difference. We will investigate this matter further. As a workaround, we recommend the following procedure:
Select the “Custom Profil” in the Control Center. Check the checkbox “Automatic GPU Overboost” and then the checkbox “Memory Overclocking”. Then go to the BIOS setup (F2), to “Advanced” and scroll all the way down.
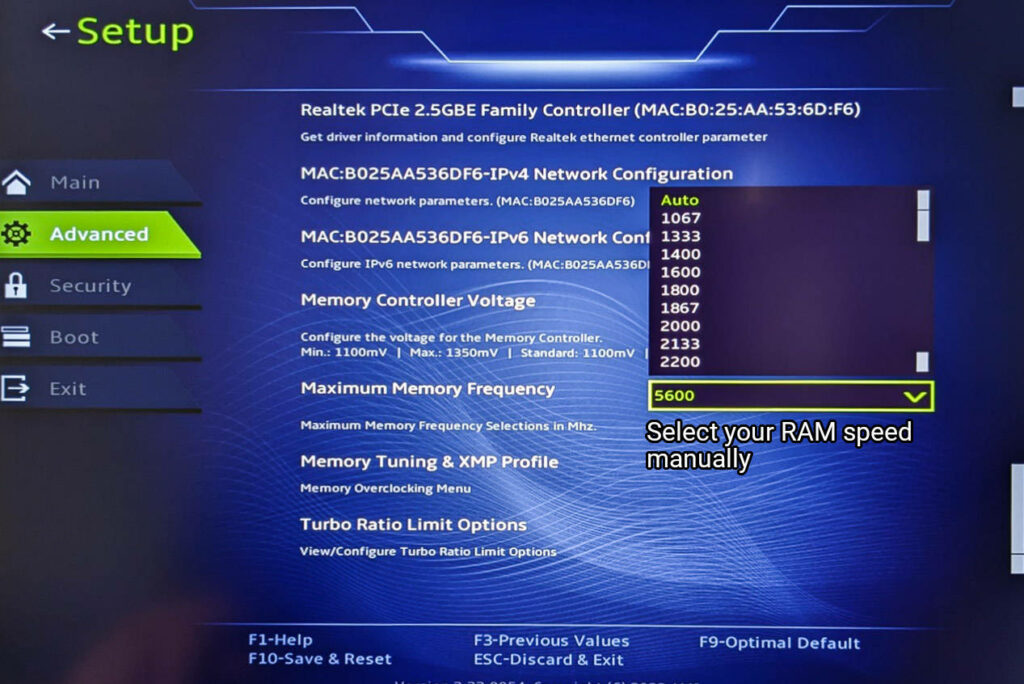
Maximum Memory Frequency” is set to “Auto” by default – change this value as follows:
- 2×8 GB or 2×16 GB DDR5-5600: select “5600”
- 1×32 GB or 2×32GB DDR5-5200: select “5200”
Note about the 32 GB modules: the modules do support DDR5-5600 and are labelled accordingly, but Intel Core 13th Gen HX only supports DDR5-5200 with these modules. The background is explained in this article (Ctrl+F: Dual Rank).
If you selected RAM modules with DDR5-4800 when configuring the laptop: select “4800”.
Rule of thumb: select the value that is on your invoice or in your order confirmation.
Press F10 to save the change.
This change is also active when you uncheck the checkbox for “Automatic GPU Overboost”. The change also applies to the other performance profiles (Balanced, Enthusiast, Overboost).
Refund policy extended
While we worked with our technology partners on the solution for this issue, we extended the cancellation period for all XMG NEO 16 and XMG NEO 17 (E23) units purchased from bestware to a dynamic period.
The agreement is specified as follows:
The 14-day cancellation period begins on the day following the publication of a final solution for this problem. The publication is considered to be the day on which all bestware customers are informed about the solution by e-mail. This e-mail information will be sent to all bestware customers with XMG NEO (E23) – also to those who have not yet contacted us with this problem.
Report back if you still have problems
If you still have freezing issues after running this BIOS update twice, please send us an e-mail, reply to this thread or contact us on Discord. Please include the following information:
- Your laptop model name:
- Your NVIDIA GPU:
- Confirm that you have updated all 3 components: EC, BIOS and ME:
- Your DDR5 memory configuration (brand, capacity and speed):
- Your Windows SSD:
- Your second SSD (if any):
- Your Wi-Fi module:
- What peripherals are connected during the freeze (docking stations, monitors, hard drives, DACs etc.):
- Did the laptop come with Windows pre-installed or did you install yourself:
Please make sure to provide all those pieces of information, even if you have already provided them in a previous thread.
Your questions
We apologize for the inconvenience that may have been caused by this issue.
Feel free to join us on Discord for further real-time discussion of this issue. There we can also answer any questions regarding the BIOS update procedure most quickly.
Thank you for your patience your team from XMG an Schenker Technologies GmbH